---
title: How to Integrate Meta Ad Account with Pearl Diver
description: By integrating Pearl Diver with Meta, businesses can leverage Pearl Diver leads to target high-value prospects. This enables you to run highly effective ad campaigns and retarget visitors based on behavior and intent data collected on their website.
---
[Skip to content](https://help.pearldiver.io/configure-your-meta-integration-with-pearl-diver#main-content)
[Raise a Ticket](https://help.pearldiver.io/kb-tickets/new?hsLang=en)

Open main navigation
Close main navigation
- [Raise a Ticket](https://help.pearldiver.io/kb-tickets/new)
- [Contact us](mailto:support@blackpearl.com)
[Contact us](mailto:support@blackpearl.com)
How can we help you?
- There are no suggestions because the search field is empty.
1. [Pearl Diver Knowledge Base](https://help.pearldiver.io/?hsLang=en)
2. [Integrations](https://help.pearldiver.io/integrations?hsLang=en)
# How to Integrate Meta Ad Account with Pearl Diver
## Authorizing Meta via Pearl Diver Dashboard and accessing Pearl Diver audience in your Meta ad account
By integrating Pearl Diver with Meta, businesses can leverage Pearl Diver leads to target high-value prospects. This enables you to run highly effective ad campaigns and retarget visitors based on behavior and intent data collected on their website.
✅**Prerequisites**
Before you start configuring, make sure you have the following:
1. A Meta ad account and valid login credentials
2. Ensure you have connected an audience for the data you would like to send through the Meta integration, and this audience has the 'Meta' action selected
When you click **Authorize** to connect Meta with Pearl Diver, the system should present you with **two distinct options** for token setup:
### Permanent Token
Additional requirements:
- A **Business** app (Live).
- A **System User** (Admin role).
- Access to the **Ad Account** that Pearl Diver will act on.
- Ability to **assign assets** (App, Ad Account) to the System User.
> UI reference: create Business app, create System User & assign assets, generate token with **Token expiry = “Never”** and **ads\_management** scope.
**Please note:** The user setting up the permanent token integration must have full access/full control permissions within Meta Business Suite. Depending on your privacy settings,
#### 1. Create a new app
Navigate to **Settings > Accounts > Apps** in Meta Business Manager and click **+ Add**.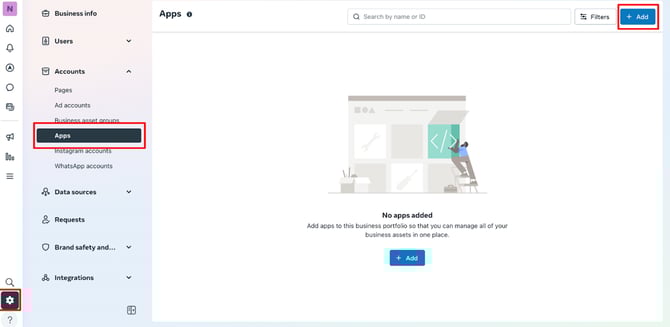
Select **Create a new app ID**. (This will open a new tab in your browser. Leave your original tab open, as we will return to it later.)
.webp?width=670&height=359&name=image%20(1).webp)
If the option to create an app is greyed out, you will need to first confirm your account with Meta. This includes setting up 2FA and adding a phone number/card details.
.webp?width=670&height=482&name=image%20(2).webp)
Fill in the **App name** and **App contact email** (this should be *your* email address), and click **Next.**
.webp?width=670&height=277&name=image%20(3).webp)
On the next step, select the last option **Other if available** and click **Next. If others is not available follow the step below instead.**
.webp?width=670&height=557&name=image%20(4).webp)
Alternatively:
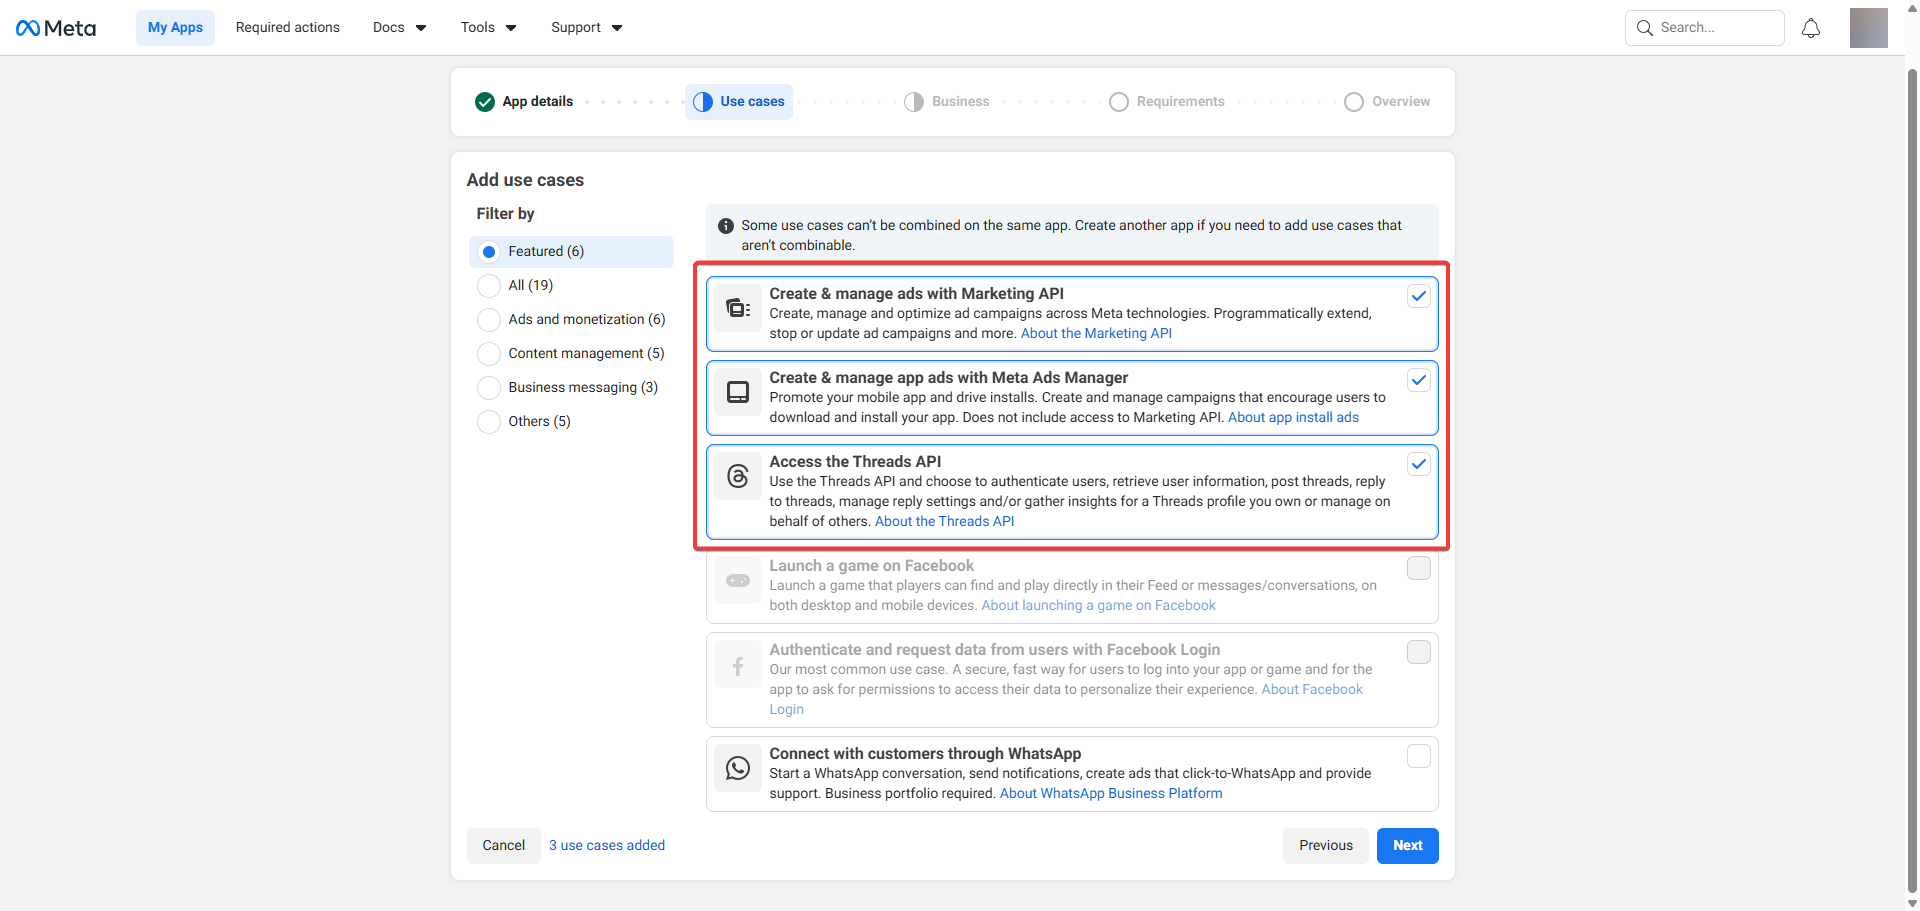
On the next step, select **Business** and click **Next.**
**.webp?width=670&height=243&name=image%20(5).webp)**
Select the **Create App** button.
.webp?width=670&height=319&name=image%20(6).webp)
Once the app is created, return to your original browser window
#### 2. Create a System User
The next step is to create the system user.
In your business account, go to **Settings > Users > System users**, and hit the **+ Add** button & accept the non-discrimination policy.
.webp?width=670&height=397&name=image%20(7).webp)
Input a **System user name** and select **Admin** as the **System user role.** Click **Create system user.**
**.webp?width=670&height=268&name=image%20(8).webp)**
#### 3. Assign Assets to System User
Next we need to assign this user to your current Ad account. Select the actions button (the three dots) and **Assign assets**.
.webp?width=670&height=344&name=image%20(9).webp)
Select the appropriate Ad account and toggle **Full control** to on.
.webp?width=670&height=415&name=image%20(10).webp)
#### 4. Assign the System user to your newly created app
Navigate back to the app you created, and select **Assign people**.
.webp?width=670&height=364&name=image%20(11).webp)
Select your new system user and toggle **Full control**. Click **Assign people** to complete.
.webp?width=670&height=540&name=image%20(12).webp)
#### 5. Generate Permanent Access Token
Navigate back to the **System Users** tab. You should see the your ad account under the Assigned assets section. Click **Generate Token**.
.webp?width=670&height=194&name=image%20(13).webp)
.webp?width=670&height=249&name=image%20(14).webp)
.webp?width=670&height=476&name=image%20(15).webp)
### **Select all 4 necessary permissions**
1. ads\_management
2. business\_management
3. pages\_read\_engagement
4. pages\_show\_list
.webp?width=670&height=672&name=image%20(16).webp)
.webp?width=670&height=646&name=image%20(17).webp)
**Copy the token that is created.**
**.webp?width=670&height=576&name=image%20(18).webp)**
Well done, now lets enable Meta Integration
- Log into your Pearl Diver account and open the Dashboard.
- Under **Actions**, select the **Meta** option.
- Toggle **Enable** to start the integration setup process.
### 60 Day Token
Step 1: Authorize Meta Integration
- Log in to your Pearl Diver dashboard
- Click the **+** icon next to **Actions** on the right hand side of the dashboard home page
- Click on **Meta** in the left hand panel
- Click **Authorize** - this will prompt you to log in to your Meta account
Step 2. Login to Meta Integration
1. A new window will open to authorize the Meta integration
2. Log into the Meta account associated with the correct ad account. The account you choose must have full access to the ad account you want Pearl Diver to upload your audience data to. Click **Continue as** to log in.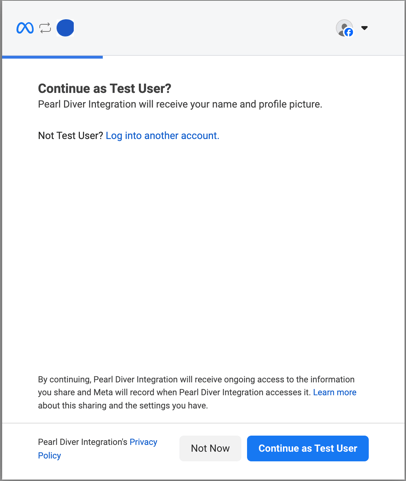
3. Select the desired option for pages you want Pearl Diver to upload data and click **Continue**
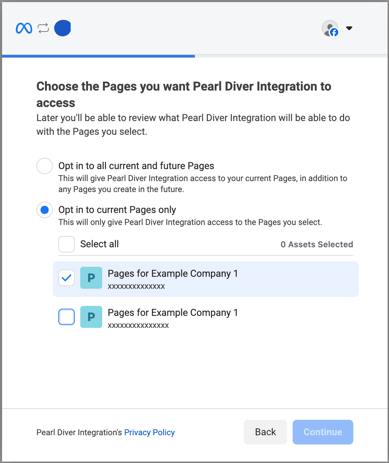
4. Select the desired option for the business you want Pearl Diver to upload data and click **Continue**. It must be affiliated with the ad account you want the data to be sent to.
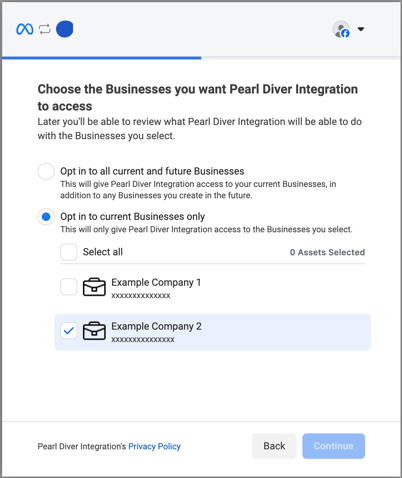
5. You will then be shown a review page of your chosen settings. Click **Continue** to proceed.
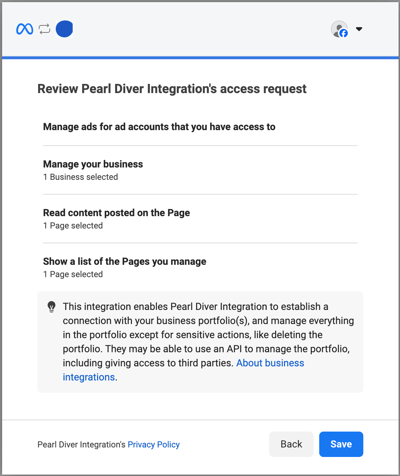
6. You will then be shown a confirmation page. Click **Got It** to proceed.
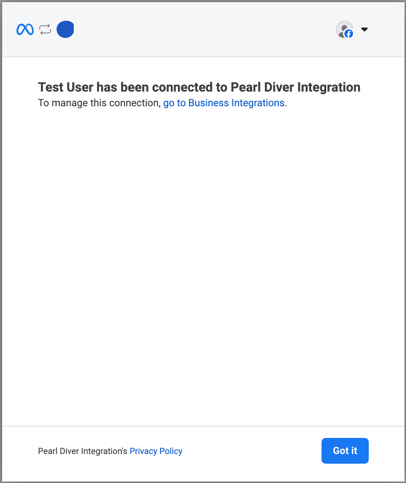
7. You will see a Pearl Diver confirmation screen. Please close this tab.
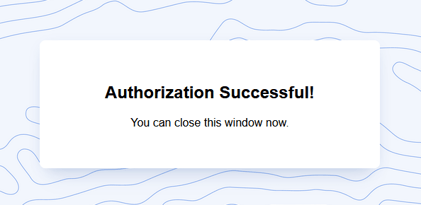
Once you have closed the Authorization Successful window, the dashboard page will retrieve a list of the ad accounts your chosen Meta account has access to.
8. In the **Ad Account** drop down below the **Authorized as** section, select the Meta ad account you would like to send the audience data to. Once selected, click **Update**.
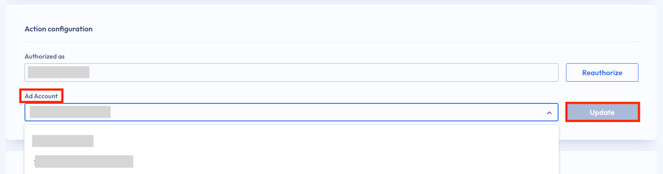
If the green check appears in the bottom right hand corner of your dashboard, you have successfully integrated your Meta ad account with Pearl Diver!
Step 3 (optional): Send your website visitors to Meta for retargeting campaigns
\*only available with a Pearl Diver tracking pixel
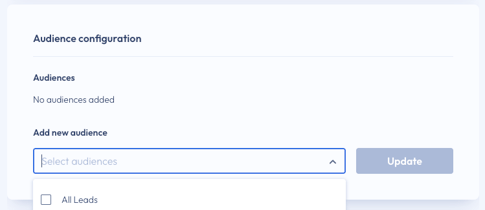
- In the **Audience Configuration** section (right below the Action Configuration) select the drop down menu to **Add New Audience. **If you would like all website visitors to be sent to Meta, select **All Leads **and click **Update**.
### **❓How will Pearl Diver audiences be displayed in my Meta ad account?**
Any Audiences sending data to Meta will be delivered to the "Pearl Diver" Custom Audience
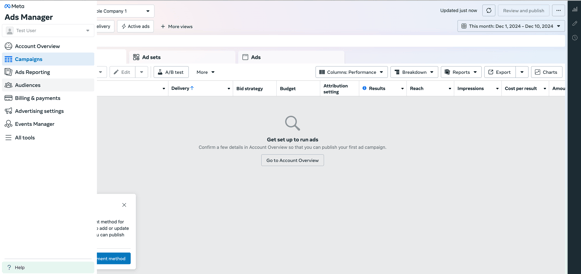
1. Click on **Audiences** in the sidebar menu of your Meta Ads Manager account
2. Your Pearl Diver audiences will be listed as shown below:
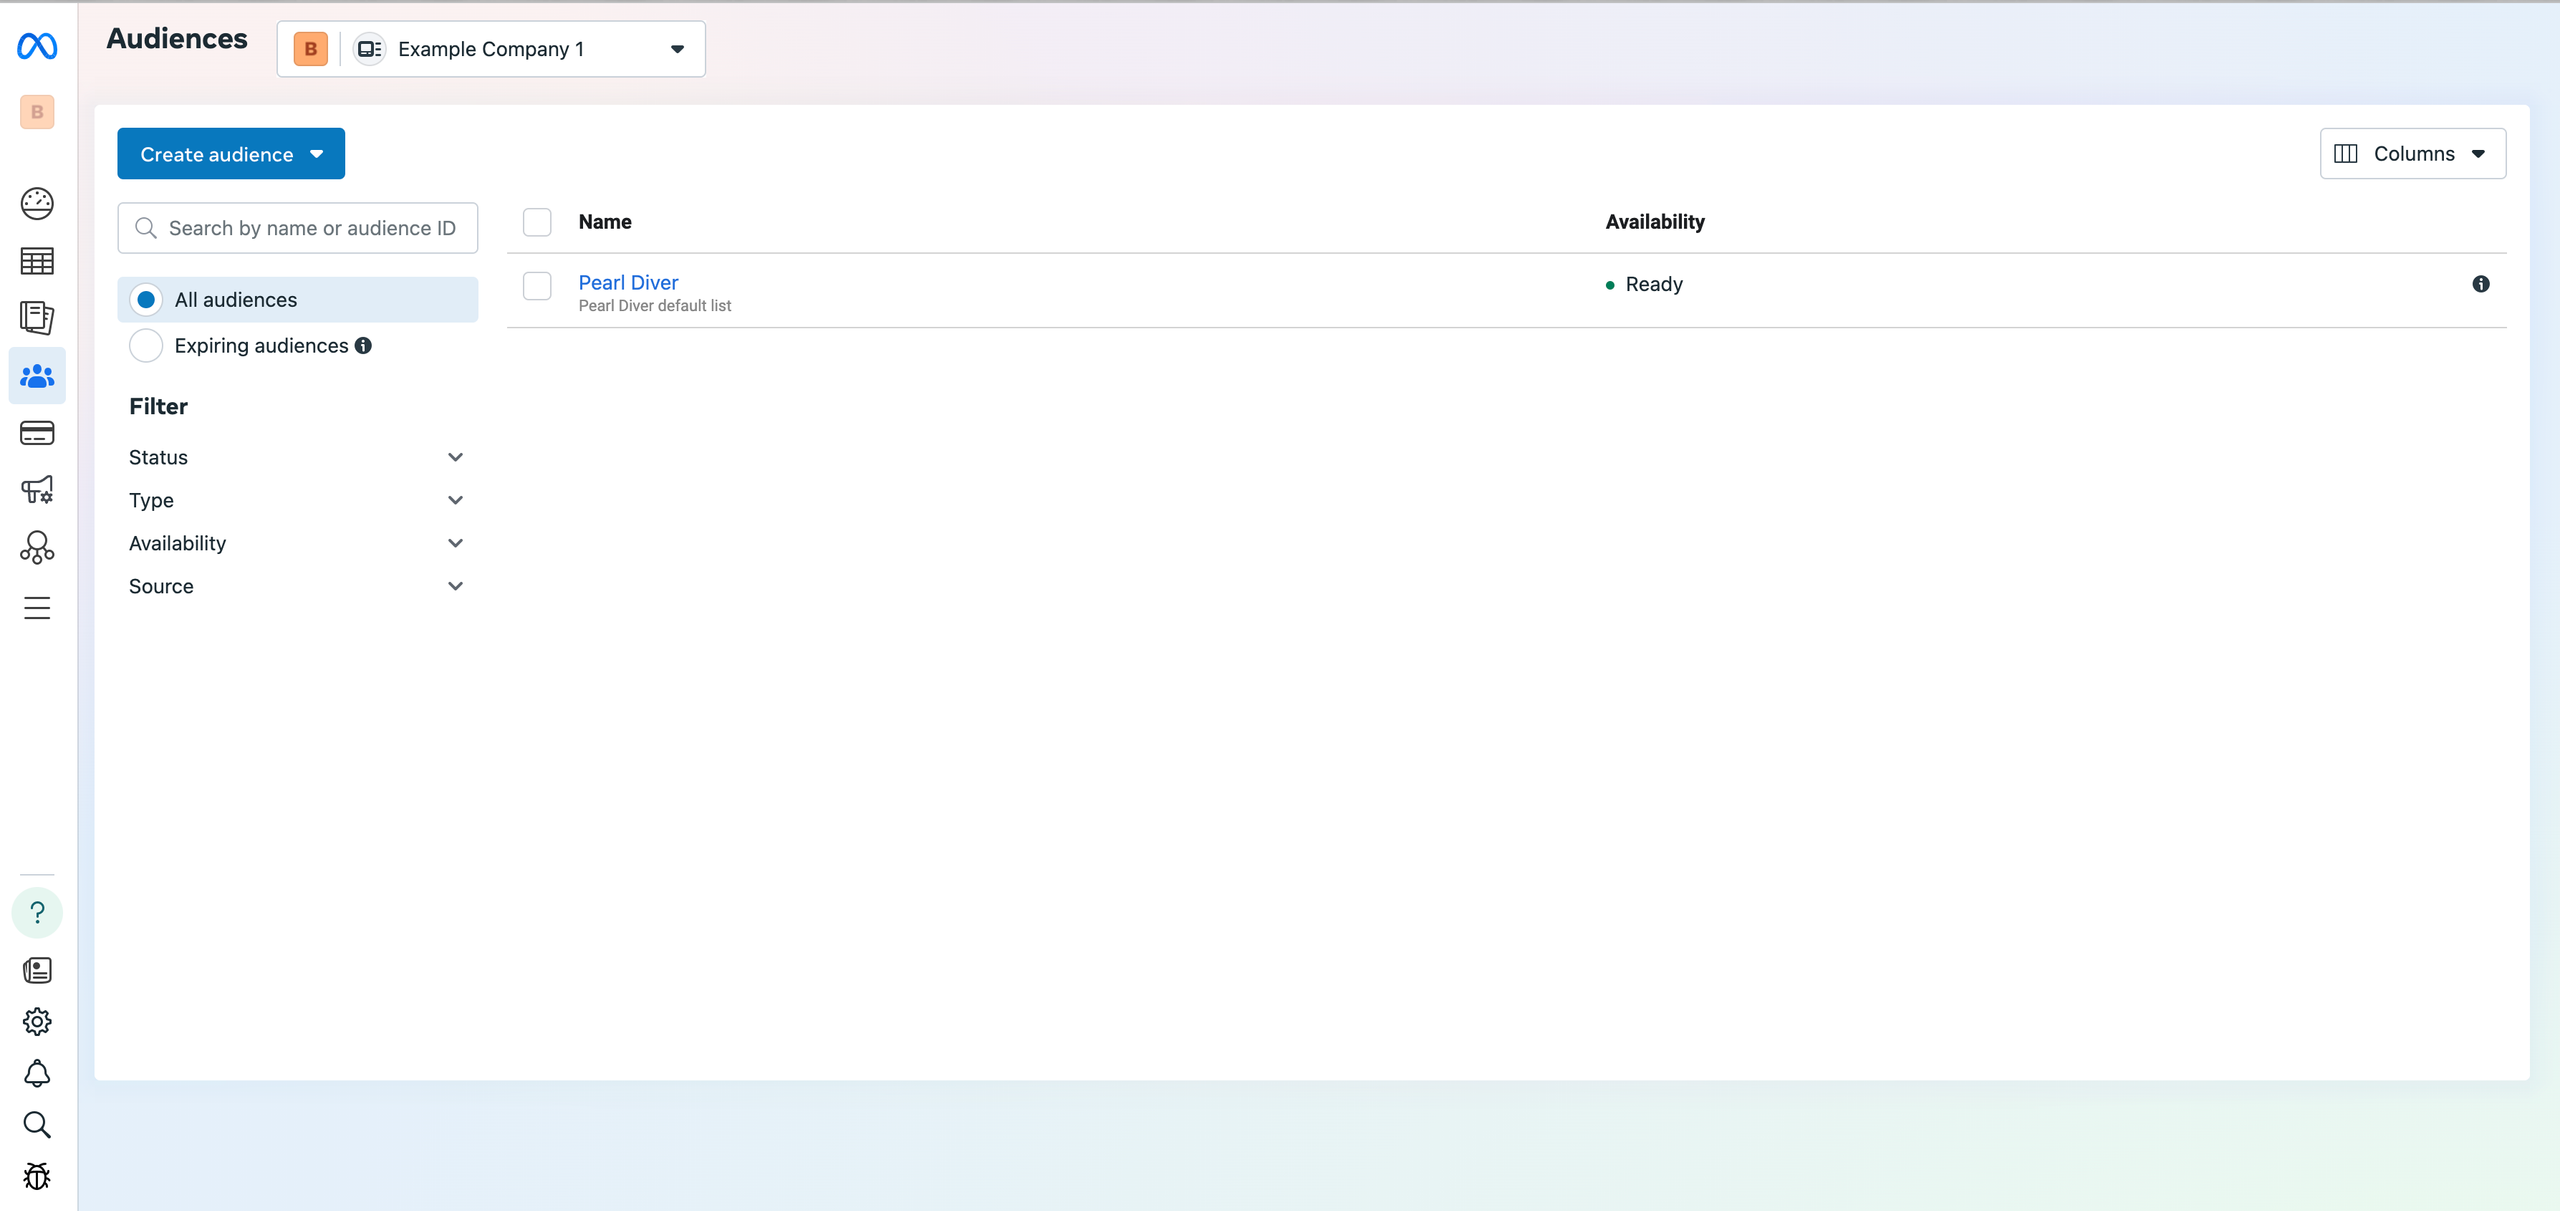
3. Click the Pearl Diver audience to see information about the audience and how it's being utilized. Navigate to the History tab to verify records have synced from Pearl Diver
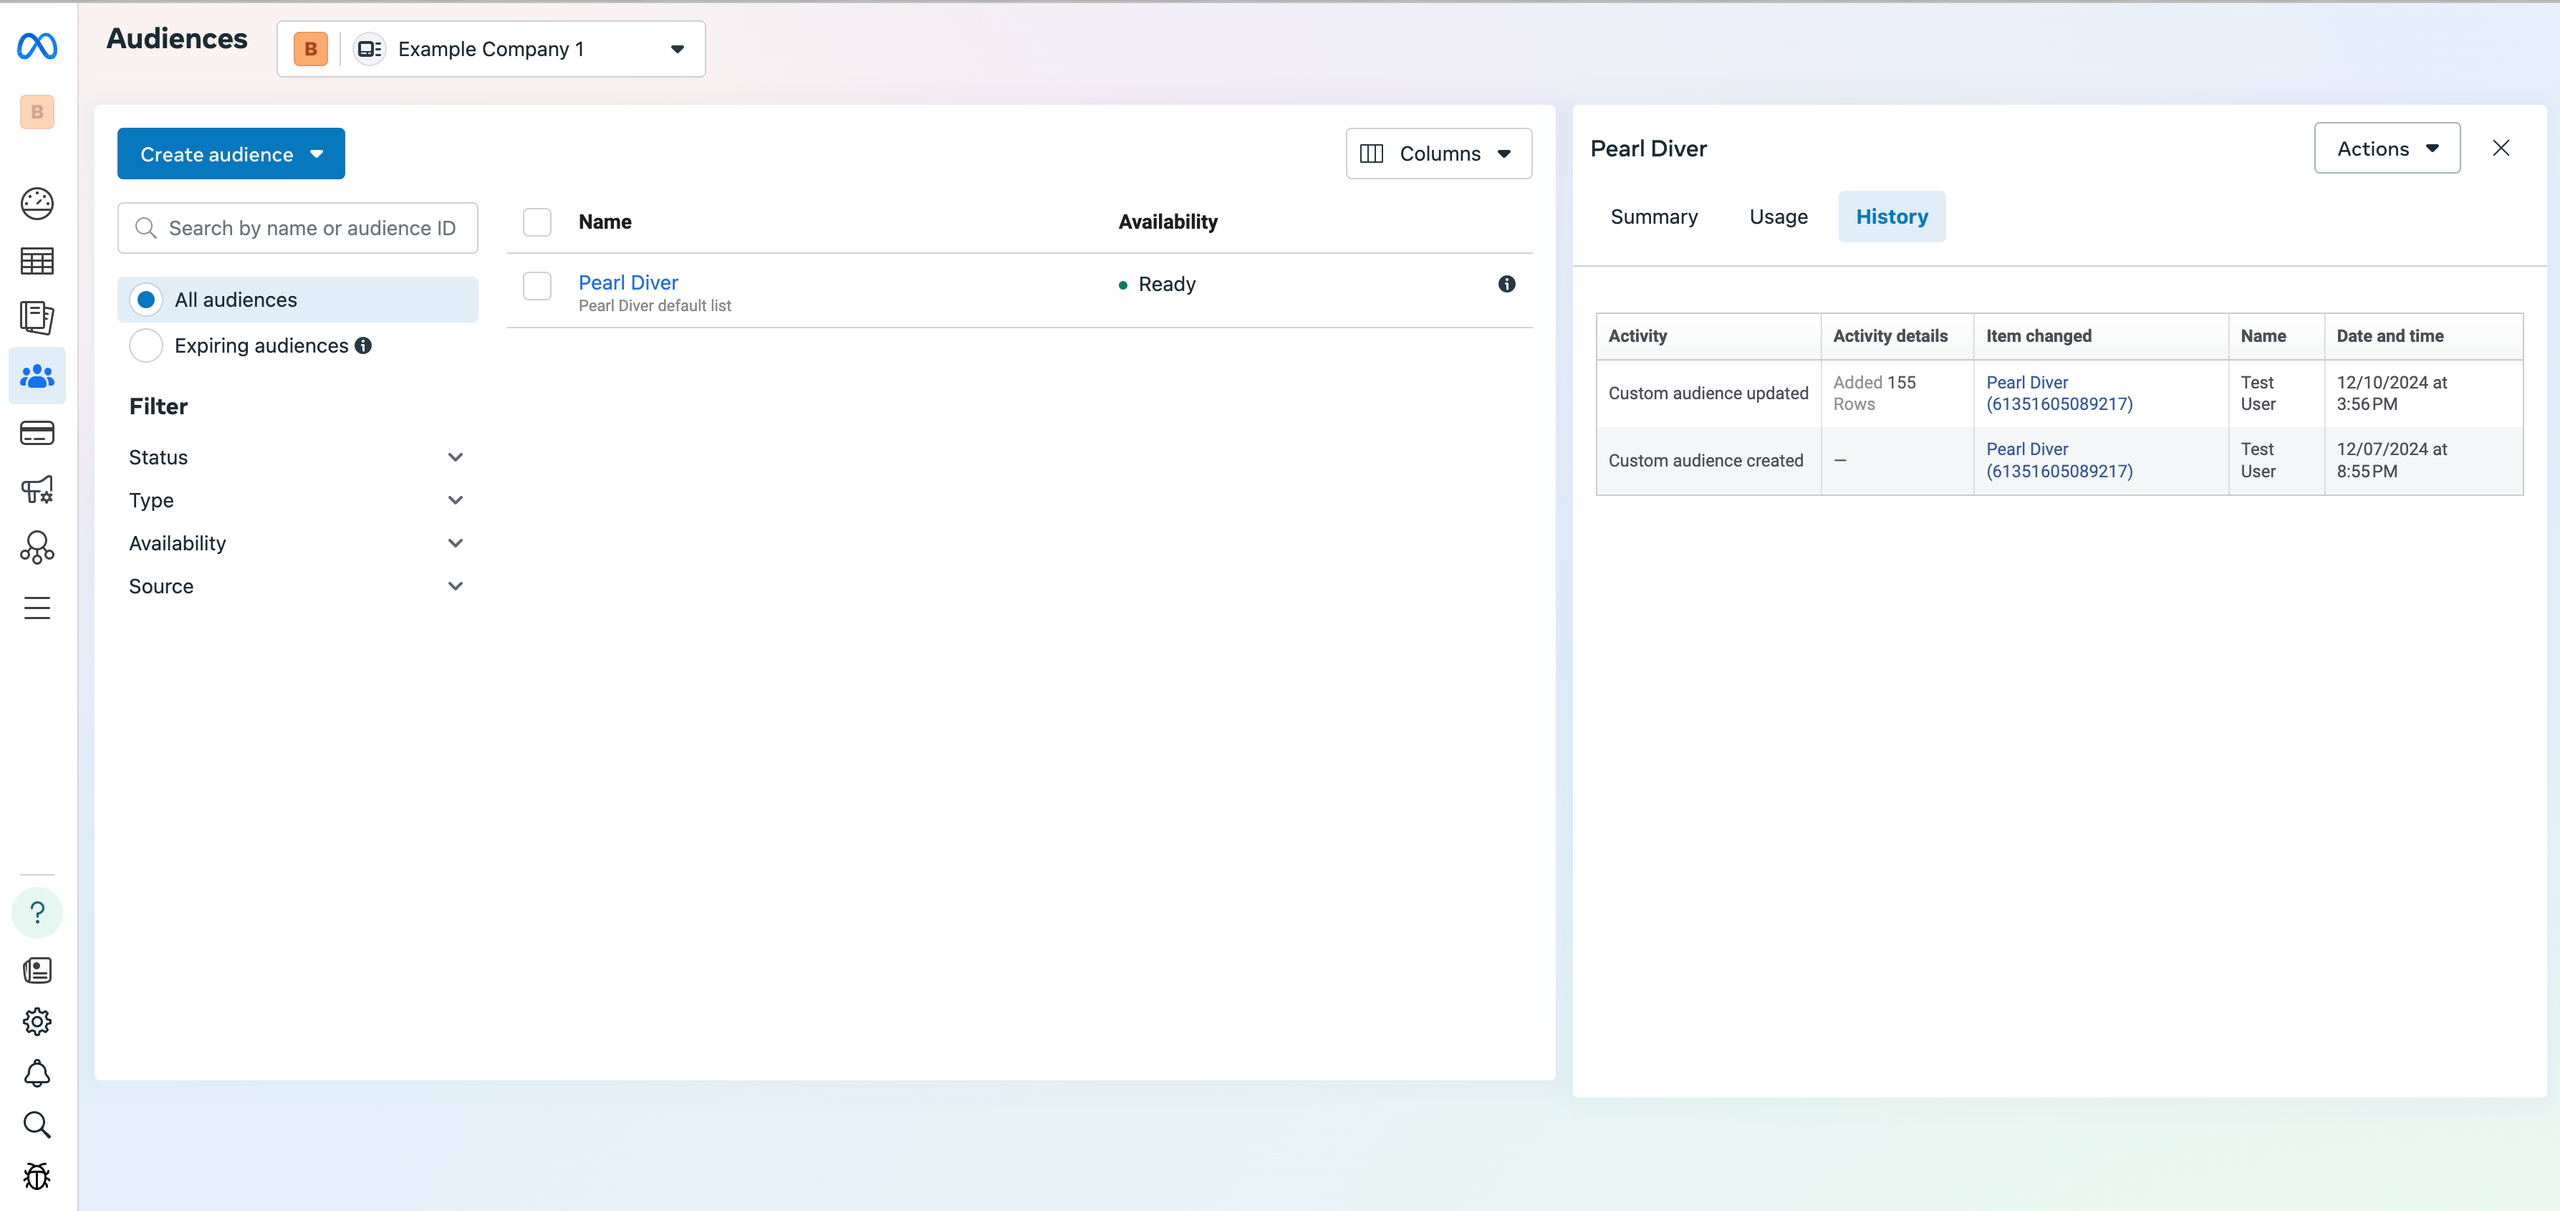To utilize the audience data in an ad campaign, select the Pearl Diver audience you would like to use in the audience section when creating an ad set.
**❓Should I use Many to One and One to One Mapping**
When you authorize Meta Ads for the first time in Pearl Diver, the system defaults to 1:1 audience mapping. This is the recommended setting for sending multiple audiences to your Meta ad account to ensure you can identify the different audiences in Meta
**❓What happens to existing audiences if:**
**Switching from Many to One to One to One:**
1. Identify all connected audiences.
2. For each connected audience:
1. Create a corresponding audience/list/tag in Meta or Google if it doesn’t already exist.
2. Map the Pearl Diver audience to the new destination audience.
**Switching from One to One to Many to One:**
1. Consolidate audiences in Meta/Google, and map all Pearl Diver audiences to the consolidated list.
**Example Use Case in Pearl Diver:**
User creates an audience in Pearl Diver with demographic filters and is named "High-Value Customers." With 1:1 mapping, a Custom Audience is automatically created in Meta Ads with the same name and will appear as "PDV | High Value Customers" in the audience section in your Meta ad account
**Switching Mapping:**
User switches from many:1 to 1:1 mapping for Meta Ads.
Pearl Diver identifies existing audiences and creates new Custom Audiences in Meta for each Pearl Diver audience.
**Updating On-Site Resolution Audience Filters:**
User modifies the "High-Value Customers" audience in Pearl Diver (changes filters, adds demographic filter, etc). The updates will sync to the corresponding audience/list/tag in Meta or Google.
**FAQs**
**❓How do I enable 1:1 Web audience mapping for the Meta ads action?**
When you authorize Meta Ads for the first time in Pearl Diver, the system defaults to 1:1 audience mapping. Once authorization is complete, you can start adding audiences, and each audience in Pearl Diver will be mapped individually to Meta Ads using the naming format "PDV | \[Audience Name\]".
**❓Where can I change the audience mapping settings?**
You can modify the audience mapping settings on the Actions page under the Audience Mapping section.
**❓What happens when I change my audience mapping from 1:1 to many:1?**
When you switch from 1:1 mapping to many:1, Pearl Diver will:
1. Create (or update) a single audience/list in Meta Ads.
2. Use the naming convention “Pearl Diver” for the audience/list.
**❓What happens when I switch from many:1 to 1:1 mapping?**
When switching from many:1 to 1:1, Pearl Diver will:
1. Create new audiences/lists in Meta Ads for each audience already connected to the action (if they don’t already exist).
**❓What happens if some audiences fail to be created when switching to 1:1?**
1. If any audience creation fails, an appropriate error message will be displayed.
2. Pearl Diver will retry or prompt the user to manually verify the connection in Meta Ads.
**❓What happens when I switch from 1:1 to many:1?**
When switching from 1:1 to many:1, Pearl Diver will:
1. Merge all connected audiences into a single Meta Ads audience/list.
2. Use the naming convention: “Pearl Diver”.
**❓What if an audience with the name ‘Pearl Diver’ already exists in Meta Ads?**
Pearl Diver will update the existing “Pearl Diver” audience instead of creating a duplicate.
**❓Will my existing audience data be lost during mapping changes?**
No, audience data remains intact. Pearl Diver updates audiences dynamically in Meta Ads without deleting any data.
- [Troubleshooting](https://help.pearldiver.io/troubleshooting?hsLang=en#main-content)
- [Website Visitor Data - Pixels](https://help.pearldiver.io/troubleshooting?hsLang=en#website-visitor-data-pixels)
- [Integrations](https://help.pearldiver.io/integrations?hsLang=en#main-content)
- [Zapier](https://help.pearldiver.io/integrations?hsLang=en#zapier)
- [TikTok](https://help.pearldiver.io/integrations?hsLang=en#tiktok)
- [REST API](https://help.pearldiver.io/integrations?hsLang=en#rest-api)
- [Salesforce](https://help.pearldiver.io/integrations?hsLang=en#salesforce)
- [Mail apps](https://help.pearldiver.io/integrations?hsLang=en#mail-apps)
- [CRMs](https://help.pearldiver.io/integrations?hsLang=en#crms)
- [General](https://help.pearldiver.io/integrations?hsLang=en#general)
- [Google Drive](https://help.pearldiver.io/integrations?hsLang=en#google-drive)
- [SharePoint](https://help.pearldiver.io/integrations?hsLang=en#sharepoint)
- [MCP](https://help.pearldiver.io/integrations?hsLang=en#mcp)
- [Beeswax](https://help.pearldiver.io/integrations?hsLang=en#beeswax)
- [FAQs](https://help.pearldiver.io/faqs?hsLang=en)
- [Getting started](https://help.pearldiver.io/getting-started?hsLang=en#main-content)
- [Web Data](https://help.pearldiver.io/getting-started?hsLang=en#web-data)
- [Intent Data](https://help.pearldiver.io/getting-started?hsLang=en#intent-data)
- [Account Settings](https://help.pearldiver.io/getting-started?hsLang=en#account-settings)
- [Best Practices](https://help.pearldiver.io/getting-started?hsLang=en#best-practices)
- [First Time User Training](https://help.pearldiver.io/getting-started?hsLang=en#first-time-user-training)
- [General](https://help.pearldiver.io/general?hsLang=en#main-content)
- [Updates](https://help.pearldiver.io/general?hsLang=en#updates)
- [Support](https://help.pearldiver.io/support?hsLang=en#main-content)
- [Web Data](https://help.pearldiver.io/support?hsLang=en#web-data)
- [Cancel your account](https://help.pearldiver.io/support?hsLang=en#cancel-your-account)
- [Features](https://help.pearldiver.io/features?hsLang=en)
[](http://blackpearl.com)
**© 2025 Blackpearl Group Limited.**