
Overview
The Pearl Diver MCP connector lets you build and manage intent audiences from the tools you already work in. Connect it once, then create, edit, and remove audiences and get insights in natural language — without opening Pearl Diver.
The connector works with any MCP-compatible tool. This guide uses Claude as the example; the same MCP URL works with other MCP-compatible clients.
Note: Web visitor audiences can't be managed through the connector yet — build and edit those in Pearl Diver.
⚡️ What You Can Do with the Pearl Diver MCP Connector
-
Build intent audiences - create new audiences based on intent topics, industries, or keywords without opening Pearl Diver.
-
Edit existing audiences - update filters, rename, or adjust targeting criteria on the fly.
-
Remove audiences - delete audiences you no longer need.
-
Get audience insights - query your audience data and get summaries, comparisons, and recommendations in natural language.
✅ Prerequisites
To use the MCP connector, you'll need:
- An active Pearl Diver account
- Your Pearl Diver login credentials — you'll be asked to sign in when authorizing the connector
- An MCP-compatible AI tool account — such as Claude, ChatGPT, or Gemini. This guide uses Claude as the example, and any Claude plan is supported (Free, Pro, Max, Team, or Enterprise). Note: Claude Free accounts are limited to one custom connector.
❓How to connect Pearl Diver using an MCP connector
Step 1: Copy the Pearl Diver MCP URL below (or from Pearl Diver's own settings page):
-
https://mcp.pearldiver.io/mcp
Step 2: Add the connector in Claude
On Free, Pro, and Max plans
- In Claude, go to Settings → Connectors → Add custom connector.
- Name it (e.g. "Pearl Diver"), paste the MCP URL ("https://mcp.pearldiver.io/mcp"), and save.
Free accounts are limited to one custom connector.
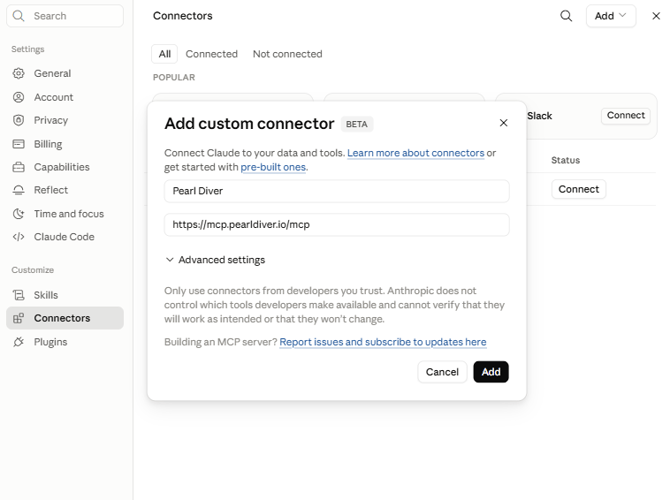
On Team and Enterprise (business) plans
Individual members can't add custom connectors on business plans — the "Add custom connector" option won't appear. A Claude organisation Owner needs to add Pearl Diver first via Organization settings → Connectors, using the same MCP URL. Once added, Pearl Diver appears in each member's connector list and everyone connects and authorises it individually (step 3). If you don't see the option, contact your Claude workspace admin.
Step 3 — Authorise Pearl Diver
Click Connect next to Pearl Diver in Claude's connector list. You'll be redirected to authorise access — log in with your Pearl Diver account credentials. Once authorised, you'll return to Claude automatically.
Everything runs on your existing Pearl Diver plan, permissions, and account settings.
Step 4 — Start a conversation
That's it. Pearl Diver is now live in every Claude conversation. Just describe the audience you want to reach — Claude calls Pearl Diver automatically and returns a full intelligence profile.
Try: "Build me an audience of protein powder buyers"
💡 Example Prompts to Get Started
|
BUILD — "Create an intent audience of people researching CRM software in New York." |
EDIT — "Add the finance industry to my SaaS Buyers audience and rename it to SaaS + Finance." |
|
INSIGHTS — "Suggest filters to tighten the targeting for my ideal customer within this audience" |
CLEAN UP — "Delete the test audiences I created last week." |
💬 Using other MCP-compatible tools
The same MCP URL works with any tool that supports remote MCP servers. Follow your tool's instructions for adding a remote MCP server or custom connector, paste the Pearl Diver MCP URL, and authorise with your Pearl Diver credentials when prompted.
🔐 How your Data Permissions Work
|
Your Pearl Diver account — everything runs on your existing plan and permissions. No separate setup. |
No data stored in Claude — audience data is fetched live each time and not retained between sessions. |
Revoke anytime — disconnect from Claude's connector settings. No lock-in. |