A tracking pixel is a small piece of code that allows you to gather valuable insights about user behavior on your website and collect this data. By properly implementing your unique Pearl Diver tracking pixel into your website, you can monitor visitor activity, analyze collected data for this visitor, and refine your marketing strategies based on these findings. Here's a step-by-step guide on how to load a tracking pixel into your website, along with instructions for common website hosts.
Step 1: Obtain Your Tracking Pixel Code
Step 2: Adding the Tracking Pixel to Your Website
- Go to your applications and add "WPCode", if you don't already have it.
- Install and Activate the plugin.
- This adds a new menu item below the settings called "Code Snippets"
- Go to "Code Snippets" -> "Header and Footer"
- Paste the provided script code into the Header section and click save.
- If you have any plugins that speed the website up using lazy loading, follow this guide to add exceptions so the pixel can fire normally.
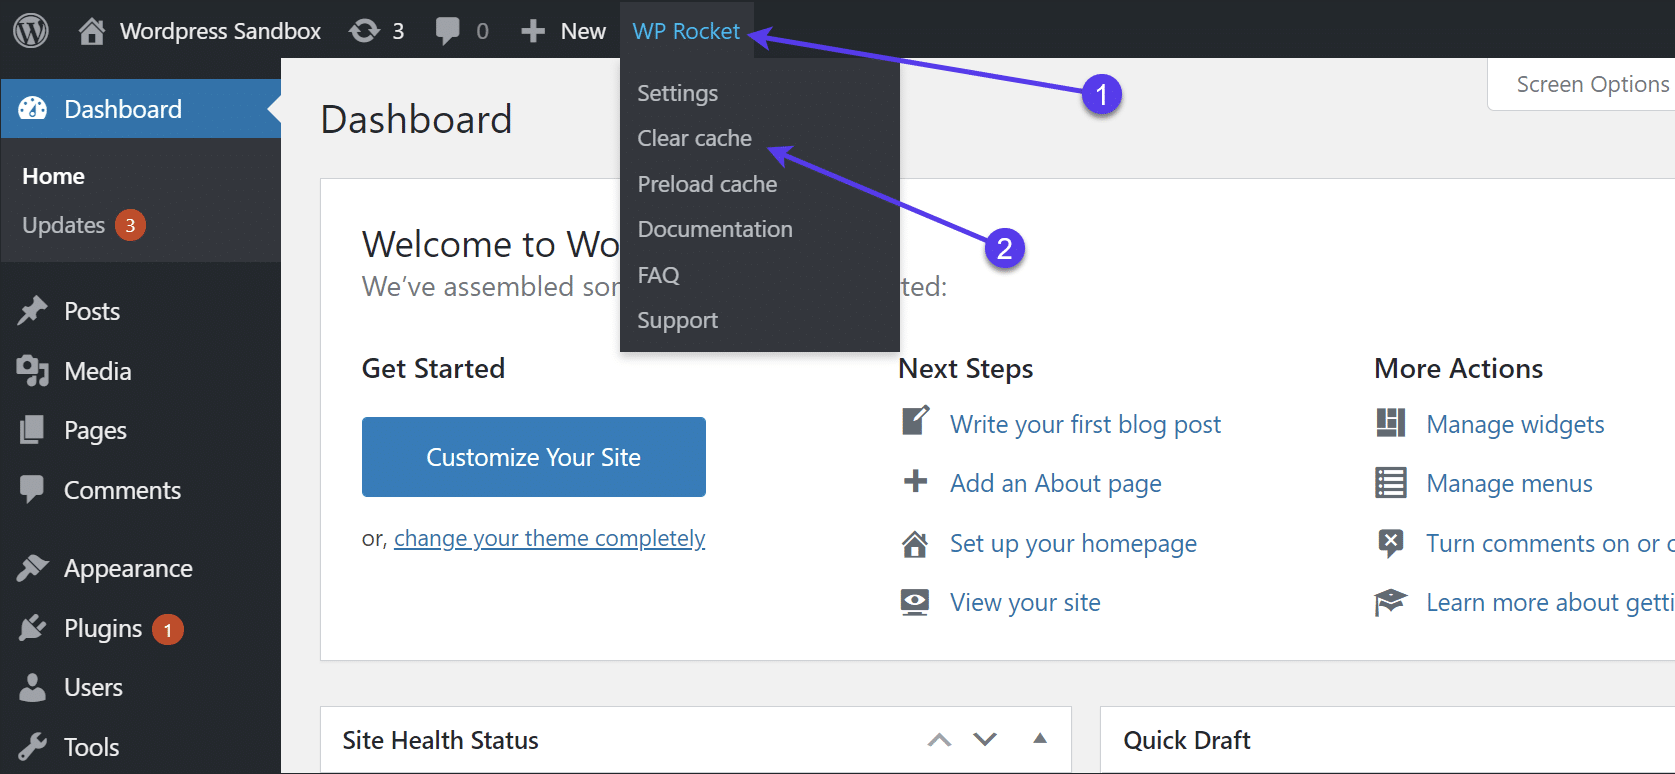
- Recommend you clear the website cache to ensure the pixel loads immediately - there will usually be a plugin installed for this. Look for Wp rocket at the top for example. See image below.
- For more detailed instructions and troubleshooting, refer to the WordPress support guide.
- Navigate to your WordPress dashboard.
- Go to ‘appearance’ in the left menu - hover over this
- Click on ‘Theme file editor’ (usually the last option when you hover over appearance)
- On the right will be a list of sections - find the option for header.php and click this
- Paste the tracking pixel code at the bottom of the header code section, before the <header/> text - This means the pixel will be inside the header as the above closes the header
- Update and/or publish the page to save changes.
- If you have any plugins that speed the website up using lazy loading, follow this guide to add exceptions so the pixel can fire normally.
- Recommend you clear the website cache to ensure the pixel loads immediately - there will usually be a plugin installed for this. Look for Wp rocket at the top for example. See image below.
- For more detailed instructions and troubleshooting, refer to the WordPress support guide.
- Log in to your Google Tag Manager account.
- Create a new Tag by selecting 'Add Tag'
- Choose the "Custom HTML" tag type.
- Paste the tracking pixel code into the HTML field.
- Configure the trigger to fire on the desired pages - recommend all pages
- Save and publish the Tag.
- For specific guidance, check out the Google Tag Manager help center.
- Open your Wix website editor.
- Go to Site in the right-corner > Settings
- Find 'Custom Code'
- Add Code- paste the script in the 'Head Code' section. Save and republish your website to put the change into effect.
- Find additional assistance in the Wix Help Center.
- Log in to your cPanel account.
- Look for the "File Manager" and navigate to your website's directory.
- Find the HTML file where you want to insert the tracking pixel.
- Click on the file and choose "Edit" or "Code Edit."
- Paste the tracking pixel code and save the file.
- Refer to your hosting provider's documentation for more information on using cPanel.
- Access your Shopify admin panel.
- Go to "Online Store" > "Themes."
- Click on the "Actions" button and select "Edit Code."
- Find the appropriate template (e.g., theme.liquid) to add the tracking pixel.
- Paste the tracking pixel code and save the file.
- Shopify's help center can provide further guidance.
- Log in to your HubSpot account.
- Navigate to your website dashboard.
- Go to "Settings" > "Website" > "Advanced Options."
- In the "Head HTML" section, paste the tracking pixel code.
- Save your changes.
- Detailed instructions are available in the HubSpot knowledge base.
Step 3: Verify and Test
- Open the website the pixel was added to in an incognito or private browsing window
- Right click and choose the 'inspect' option OR click F12 on keyboard
-
You may need to click the two arrows at the top of the inspect menu and choose the ‘Applications’ option.
-
Expand the Cookies option
-
If you see "tuid" under application-> Cookies here this means the pixel has been loaded correctly

✅Book a support call if you need help